Mount Pierre Elliot Trudeau
July 15, 2012
2620m
Valemount, BC
Mt. Pierre Elliott Trudeau, or commonly known as “Mt. Trudeau”, is a prominent peak dominating the west skyline of townsite Valemount, in the Cariboo Range in the Columbia Mountains. To get to Valemount involves a fairly long drive from three major cities, Calgary, Edmonton and Vancouver. And to get to the trail head involves a 15 km drive on a rough logging road where a high clearance 4WD is required. This is not an easy objective and requires some tricky 4th class scrambling and/or steep snow climbing depends on the season.
Eric and I were tired after the 1800-meter elevation gain on Mt. Terry Fox so we were looking for something “less demanding”. The weather forecast was not the greatest neither with mostly cloudy conditions and some possible thunder showers in the afternoon. The idea of making an ascent of Mt. Pierre Elliot Trudeau came from the brochure we got from the information center. It seemed to be shorter as the approach road would dispatch a good amount of elevation gain, but the description was poorly worded and lacked details.

Mt. Pierre Elliot Trudeau ascent route
To get to the trail-head, drive south from Valemount and watch for the sign to Kinbasket Lake. Turn right at the junction. Note that Cranberry Lake Road is not the one you want, so take an immediate left when seeing Cranberry Road sign. After that, rather than following the description, I suggest you just follow the most obvious track, and it will lead you to Westridge FSR. Drive up this rough-like-hell road for 14.5 km. The trail-head was overgrown but we did manage to find. We arrived here before dark so swatting mosquitoes was easier this time (still needed about 30 min to do so). It was a bit cooler due to the higher elevation, and therefore we had a nicer sleep.
We woke up at 7 am and started the trek in less than an hour. The trail was easy to follow even though it’s overgrown at places. Soon we arrived at a creek crossing. The log would impose a bit of challenge for hikers as there’s no hand line, but for scramblers it’s straightforward. There were sections chocked with dead falls (sucks). After 50 min hiking we arrived at an open area, the start of the marsh land. The major challenge for the next 2 km distance was to not get our boots wet. Well, it was practically impossible.. Sometimes it looked like a rock but actually just a chuck of bog. We could just probe for these suspicious steps using our poles but that would be very time consuming. We arrived at the first lake (the lower basin) with boots already soaked. The reflection of the mountain in the lake was fantastic. However, I need to note for two things here. First thing is grizzly, as it’s obvious an activate bear country so make lots of noises. Second thing is the mosquitoes… It was worse than on Mt. Terry Fox. We used literally tons of bug spray. I even ate 2 of them by just breathing…. Holy moly.

The trailhead sign

Eric crossing a log bridge

This is our objective. We followed the LHS Ridge. The easiest route goes up the RHS ridge.

At the lower basin. Now the trail gets muddy and our boots were quickly soaked.

At the lake. This is NOT a perfect camping spot unless you enjoys mosquitoes…
At the other end of the lake, we crossed a snow field, and then started the grind up the first headwall. It’s really just a very steep and wet/slippery grassy slope and again, with lots of mosquitoes around. After the headwall we arrived at the middle basin. There was indeed a lake but half frozen. There’re several possible ways up to the upper basin. The description doesn’t have this part so we decided to go climber’s left which turned out to be a poor decision. We made this decision because it led us to east ridge quicker so we could avoid mosquitoes quicker. The bump ahead turned out to be the first of (many) false summits along this ridge and our adventure would begin from here…

Our route follows the right hand edge of snow line at the center of this photo.

There are many attractive waterfalls

Mount Robson.

Above the treeline, but mosquitoes were still abundant

Snow offered easy travelling

Panorama of Rocky Mountain Trench from the first bump. Click to view large size.
After topping out on this first false summit, we got a clear view of the upper mountain, the east ridge route. Now what… We had several options. We could use the steep snow on climber’s right, or traverse on ledges on climber’s left. After a brief discussion, we decided to stay on the ridge top.. It looked like the east ridge of Edith Cavell. Many people have free solo’d that route and we’d like to get some “feel” about it, and we gonna have to pass this test first…

This is our route up – East Ridge

I like this alpine bowl. The lakes were just about to thaw
The climb started pretty easy, difficult scrambling (3rd class) on dry blocks. Not far up, we reached our first technical move, a friction 2-meter-wall. It provided a very good warm-up for the upcoming challenges. These are a series of photos of this friction move. After this step, the terrain became semi-technical. For those familiar with Alan Kane’s Scramble in the Canadian Rockies, this part is a “climber’s scramble”, or you can say, 4th class with some lower 5th class moves.

Now the fun part began!

It’s getting hard…
In short time we were facing an even steeper wall, with down-sloping and overhanging slabs everywhere. I tried tackle it head-on and soon turned back after a few moves up. There’s no obvious hold, and the terrain was definitely no longer “low 5th class”. There’s no way we could go up that wall without rope and protections. We were forced to go climber’s right onto snow. We squeezed between the snow and wet rock, and from here on, the game became a real mountaineering. We managed to traverse about 20-30 m to climber’s right with awkward moves before spotting an easier line up back to the east ridge. There’s a harder move to get up to this line. Eric took out his ice axe and stepped on the very steep snow. I tried up that wet rock step but failed, but I soon found a semi-broken rock. I broke that rock apart which gave me an extra foot hold, therefore I could move up that step. Since Eric was on the snow now, he just simply ascended that steep gully comfortably (he’s very good at snow). I used the rock beside the snow, which was again a “climber’s scramble”.

Me climbing up a typical step. Photo by Eric C

We wedged ourselves in between (wet) rock and snow

Me following up. Photo by Eric C

We eventually found a break through the cliff, and Eric took the lead, step-kicking up a steep couloir.
The terrain was sustained 3rd to 4th class for the next section, until we reached another overhanging area. Again, we were forced to traverse to climber’s right, squeezing between snow and rock again. There was one harder move proved to be the crux of the East Ridge route. It was only about 2 m high but I couldn’t find any hold on the wet rock. The snow was so thin that we couldn’t trust, but we didn’t have a choice. Eric stabbed his ice axe in the very thin snow scoop and used that as an extra hold. I squeezed through a tunnel beneath that snow scoop and used the rock on the other side to climb. Although short, this step felt definitely harder than “low 5th class”. Back up to the ridge, we found there was one more summit to climb, although this one looked not as bad as the lower section.
One of the easier ridge sections. Photo by Eric C

Eric started the next step

The upper ridge ahead. We were forced to traverse right again about halfway up.
Indeed the climbing became easier, but we had to deal with perhaps the loosest scree I’ve ever seen (more like sand). It was practically impossible to not kick down rocks. I was following Eric but at one point he dislodged a whole bunch of rocks including a microwave towards me. I was on some semi-technical terrain and thankfully the big chuck missed me. Now instead of following Eric up, I was forced to traverse further climber’s right into the next gully. The scrambling here was probably just “moderate” but the scree bashing was horrendously tedious. Eventually I cleared this gully and topped out on the summit ridge. I thought Eric was ahead of me but I couldn’t see him. I shouted and he responsed from below… He was forced to back track and traversed to the gully I used to ascend, as his gully led to another overhanging section. Too bad I didn’t take photos for this section.

A view of Premier Range just before topping out on the North Ridge.
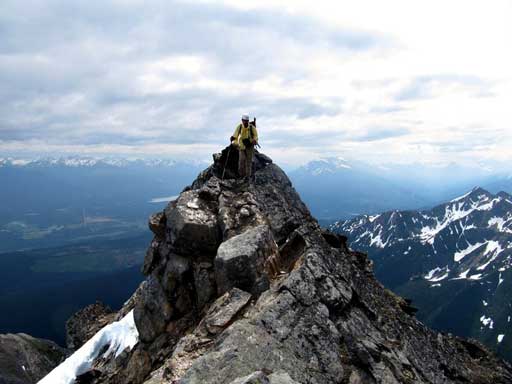
Whether you go for the north ridge route or east ridge route, the summit block is unavoidable. You first had to get up an exposed step with good holds (difficult scramble here). Then you gonna face another overhanging boulder. Traverse underneath it on climber’s left. The ground looks unstable and exposed and a consequence of fall here is probably fatal (climber’s scramble for this step). Then we stood on the summit!! Cheers!!

The first step of the summit block. Photo by Eric C

Eric follows up this step.

The second step of the summit block. Photo by Eric C
We took the obligatory panorama despite the cloudy and somewhat smoky view towards the Rockies side. The view towards the Cariboos were much better, although some of the very high peaks were in the clouds. There was even a fancy register on the summit, not many entries though. We were the first one of 2012. The most impressive view is towards the icefield surrounding Mount Sir Wilfred Laurier. Lots of big crevasses..

Summit Panorama. Click to view large size

Premier Range

More about the Cariboo Mountains

The summit register is kinda unique.
Based on description, there must be a less exposed way down the other side (west ridge). We tried it for about 50 m or so, and the terrain only became more and more jagged, broken and exposed. We were able to spot a snow line not far from where we were standing. We both agreed that it might be doable but we had to down-climb a tricky section. Some steep ledges on down-climber’s left helped for the initial bit, but then everything gave way to a 10-15 cm crack, in the middle of a wet slab. Skier’s right was a drop-off. The wall on skier’s left was too wet to grip. I had no technical climbing experience so took a long while to figure out how to get a grip by “counter forces”. We did manage to get down (somehow) without incidence. After that it came the first steep snow down-climb, 40 degrees ish for a while. Eric was super good on snow so he did the step-kicking, while I just followed. And now we were down to the northwest bowl of the mountain.

Me negotiating the wet slab. Photo by Eric C

Almost down to the snow. Photo by Eric C

By the time I made down the slab, Eric had already made a good distance down the steep snow.
We plunged-step down a gentle snow field/glacier and even had some fun glissading. Now deep in the NW bowl we had to ascend to the north ridge, where we only found out that other side was a drop off… We tried to traverse on the ridge, but both directions ended at drop-offs pretty soon. We also tried to traverse on the west slope but that was just a maze of wet slab and finally we were forced to drop down back. According to the poorly worded description, a col further down the north ridge should be the correct one. We descended further down on snow, and ascended the tedious scree and rubble up to that col, only to find out another drop-off. By the same time, weather finally moved in and we were getting soaked by rain. I got lost in this situation. I said, let’s take a energy break first. Eric gave me an energy gel which helped quite a lot for the rest of the day. We pretty much only had 3 options now.
1. Continue down the NW side of the mountain followed by bushwhacking the entire drainage or river whatever to Highway 5, find a place to bivy in Valemount, and hike up the logging road to get our car the next day…
2. Climb back up to the summit and use our ascend line to get down.
3. Climb back almost to the summit and use a very steep snow on the northeast face to get down.
Option 1 was the one we would take if the other two fail. It would have been more like a survival thing had we gone that direction. Option 2 would be extremely dangerous. Doing all of those 5th class climbing downwards in bad weather required more concentration and strength. We were exhausted so we would make mistake and any mistake on the east ridge would be fatal. Option 3 was pretty much our only option. Thankfully the rain stopped soon so there was some hope. Now, the short-term goal was simple, backtracking into the NW bowl followed by trudging up snow (and glacier) back towards the summit. It was very discouraging but that was our only option.
At the col we realized that the snow was even steeper than anticipated. And there were 2 big cornices hanging above the slope. But again, that was our only option. The snow was hard so an avalanche was very unlikely. There’s a chance that the cornice would break and hit on us and send us down the slope. It was possible but we took our chance here. Again, Eric did the step-kicking and I followed. This slope was considerably steeper AND longer than the one we just down-climbed. This would be my steepest snow climb.

Eric led down the big slope.

Me down-climbing. Photo by Eric C
After this slope, the hardest part was done!!! Now it was time to enjoy the fun glissading. We almost managed to glide down to the middle basin, while taking in the views of the several semi-frozen tarns. Getting down the steep wet grassy slope to the Lower basin required caution and patience. We took our time here and got down without too many slipping and falling. Another snow slope led us back to the first lake. The rest of the way was mostly characterized by the mosquitoes and “hey-yoo-bears”. I ate at least another mosquito here…

Time to glissade

We got closer to these alpine lakes on the way down.

Canoe Mountain was obscured by some interesting clouds

There was water flowing beneath the snow. Good thing we didn’t fall through

Look at these mosquitos…
Overall this was a bit of an “epic” trip but on the bright side I got lots of experience built in. Except for the “getting lost” part, we didn’t encounter situations that were out of our control. I have to thank Eric for a big time for his step-kicking and route-finding down that two snow slopes, as well as his energy gel. I couldn’t believe I managed to finish this route on my flexible and non-waterproof hiking shoes. Having a partner with you when getting lost really can make you calm down and think positively what you should and can do next, rather than just being panic. It was my first time getting cliffed out on descent…
Finally, the driving home part. We got our dinner in Valemount A&W after driving down that logging road, and it was already 10 pm by the time we started driving home. Eric took several naps along the way and we got back to Edmonton by 4:30 am Monday morning (which wasn’t nearly as bad as our Waterton trip two weeks ago)…
